Integrations setup
Integrations can be configured only via the YAML file!
Also, don't forget to restart the Kuvasz container after modifying the YAML file for the changes to take effect!
Your integrations are the channels through which Kuvasz sends notifications about the status of your monitors. You can use Kuvasz without any integrations, but it won't make much sense in most of the cases, because you won't be notified about any issues with your monitors.
Where to put them exactly?
You're free to put your integrations under integrations: in your YAML configuration file, wherever you like. The only restriction is that under integrations you can only use the integration types that are supported by Kuvasz.
How can they be referenced?
You can reference your integrations in your monitors by their ID, which is always dynamically generated by concatenating the type and name of the integration, separated by a colon (:). For example, if you have a Slack integration with the name slack-example, its ID will be slack:slack-example.
Tip
Find out more about assigning integrations to your monitors in the Managing monitors section of the documentation.
Common settings
All the integrations share some common, generic settings , which means that it doesn't matter which integration you configure, you can use the same settings for all of them.
name
2.0.0
string
The name of the integration. It must be unique across the given type of integration, so you can have multiple Slack integrations, for example, but they must have different names, and vice versa: you can have multiple integrations of different types with the same name.
Warning
The name can contain only alphanumeric characters (a-z, A-Z, 0-9), underscores (_), or dashes (-).
enabled
2.0.0
true
boolean
Whether the integration is enabled or not. If it's set to false, the integration won't be used, and no notifications will be sent through it, however you can still reference it in your monitors.
global
2.0.0
false
boolean
Whether the integration is global or not. If it's set to true, the integration will be used for all monitors by default, even if they don't have a specific integration assigned to them. If it's set to false, the integration will only be used for monitors that explicitly reference it.
Slack
Configuration alias: slack
The Slack integration allows you to send notifications to a Slack channel via a webhook URL.
webhook-url
2.0.0
string
The webhook URL of the Slack channel where the notifications will be sent. You can create a webhook URL in your Slack workspace by following the official documentation.
integrations:
slack:
- name: slack-example
webhook-url: 'https://hooks.slack.com/services/T00000000/B00000000/XXXXXXXXXXXXXXXX'
- name: slack-global
webhook-url: 'https://hooks.slack.com/services/T00000000/B00000000/XXXXXXXXXXXXXXXX'
global: true
# ... other Slack integrations
Configuration alias: email
The email integration allows you to send notifications via email. You can have multiple email integrations, each with its own sender and recipient addresses.
Warning
To make the email integration work, it's not enough to just configure the integration itself, you also need to set up the SMTP configuration in your YAML file. You can have multiple email integrations, but they will all use the same SMTP configuration.
For more information, see the SMTP configuration section of the documentation.
from-address
2.0.0
string
The email address from which the notifications will be sent. This is the address that will appear in the "From" field of the email.
to-address
2.0.0
string
The email address to which the notifications will be sent.
integrations:
email:
- name: email_implicitly_enabled
from-address: noreply@kuvasz-uptime.dev
to-address: your@email.address
- name: email_disabled
from-address: noreply@other-sender.com
to-address: other-recipient@blabla.com
enabled: false
# ... other email integrations
PagerDuty
Configuration alias: pagerduty
The PagerDuty integration allows you to trigger incidents in PagerDuty when a monitor goes down, and to automatically resolve them when the monitor comes back up.
Things to do in PagerDuty first
- From the Configuration menu, select Services.
- There are two ways to add an integration to a service:
- If you are adding your integration to an existing service: Click the name of the service you want to add the integration to. Then, select the Integrations tab and click the New Integration button.
- If you are creating a new service for your integration: Please read our documentation in section Configuring Services and Integrations and follow the steps outlined in the Create a New Service section, selecting "Kuvasz" as the Integration Type in step 4. Continue with the "In Kuvasz" section (below) once you have finished these steps.
- Enter an Integration Name in the format
monitoring-tool-service-name(e.g. Kuvasz-Your-Service) and select "Kuvasz" from the Integration Type menu. - Click the Add Integration button to save your new integration. You will be redirected to the Integrations tab for your service.
- An Integration Key will be generated on this screen. Keep this key saved in a safe place, as it will be used when you configure the integration with Kuvasz in the next section.
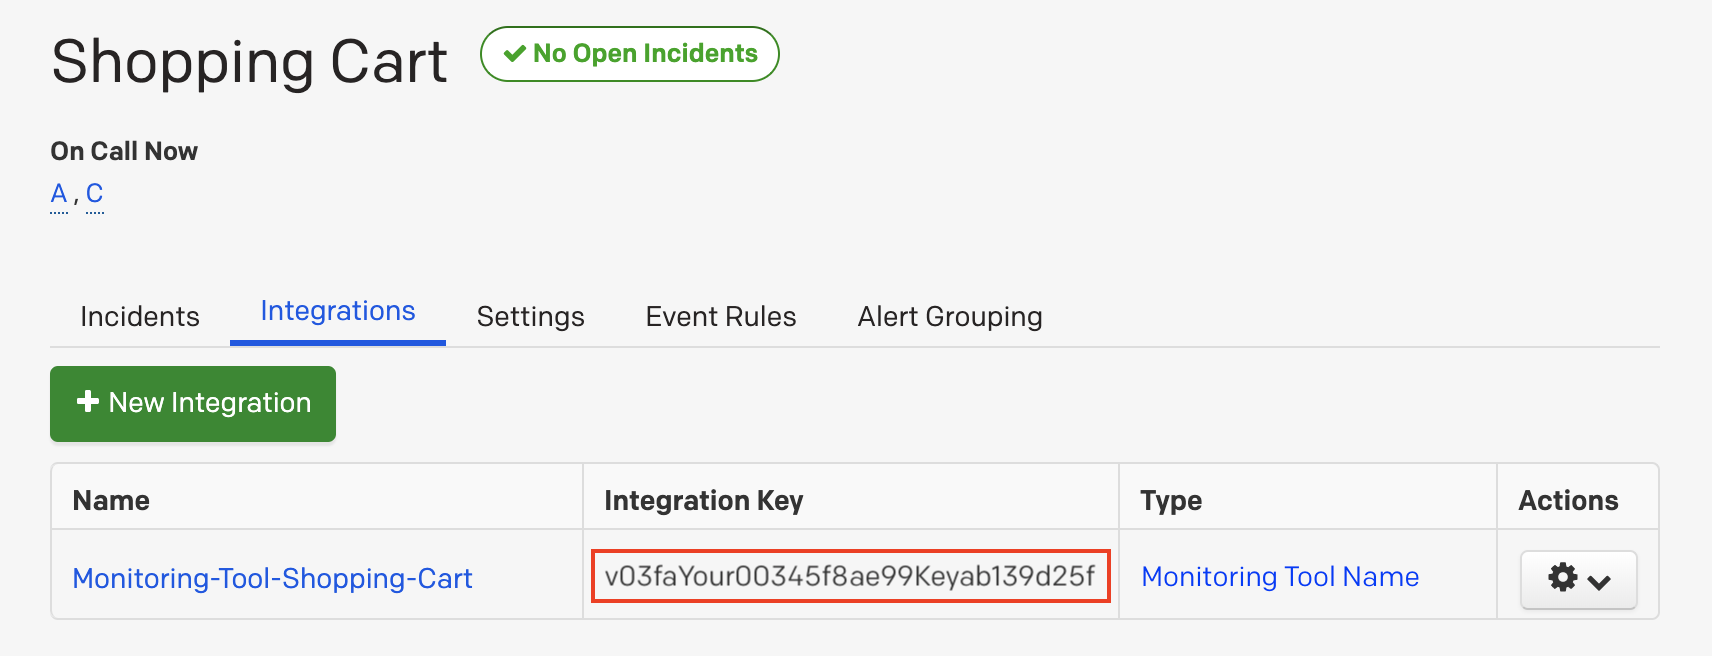
integration-key
2.0.0
string
The integration key of the PagerDuty service where the incidents will be created. You can find this key in your PagerDuty service settings.
integrations:
  pagerduty:
    - name: pd_global
      integration-key: YourOwnIntegrationKey
global: true
- name: pd_disabled
integration-key: YourOtherIntegrationKey
enabled: false
# ... other PagerDuty integrations
Telegram
Configuration alias: telegram
The Telegram integration allows you to send notifications to a Telegram chat via a bot.
Getting your bot token and chat ID
- Create a new bot by talking to the BotFather on Telegram.
- After creating the bot, you will receive a bot token, this will be your
api-token. - Invite your bot to the chat where you want to receive notifications, or create a new group and add the bot to it.
-
To get your chat ID, send a message to your desired chat and then visit
https://api.telegram.org/bot<YourApiToken>/getUpdatesin your browser, where<YourApiToken>is the token you received from the BotFather. Look for something like this in the response, this will be yourchat-id:
api-token
2.0.0
string
The API token of the Telegram bot that will send the notifications. You can get this token from the BotFather when you create your bot.
chat-id
2.0.0
string
The chat ID of the Telegram chat where the notifications will be sent. You can get this ID by following the steps outlined in the Getting your bot token and chat ID section.
integrations:
  telegram:
    - name: telegram_global
      api-token: 'YourToken'
      chat-id: '-1232642423121'
      global: true
    - name: telegram_disabled
      api-token: 'YourOtherToken'
      chat-id: '-1232546142423121'
      enabled: false
    # ... other Telegram integrations
Do you miss an integration?
If you miss an integration, please open an issue, or consider contributing it yourself! We are always open to new integrations and would love to see your contribution.