Integrations setup
Integrations can be configured only via the YAML file!
Also, don't forget to restart the Kuvasz container after modifying the YAML file for the changes to take effect!
Your integrations are the channels through which Kuvasz sends notifications about the status of your monitors. You can use Kuvasz without any integrations, but it won't make much sense in most of the cases, because you won't be notified about any issues with your monitors.
Where to put them exactly?
You're free to put your integrations under integrations: in your YAML configuration file, wherever you like. The only restriction is that under integrations you can only use the integration types that are supported by Kuvasz.
How can they be referenced?
You can reference your integrations in your monitors by their ID, which is always dynamically generated by concatenating the type and name of the integration, separated by a colon (:). For example, if you have a Slack integration with the name slack-example, its ID will be slack:slack-example.
Common settings
All the integrations share some common, generic settings , which means that it doesn't matter which integration you configure, you can use the same settings for all of them.
Name
2.0.0
string
name
The name of the integration. It must be unique across the given type of integration, so you can have multiple Slack integrations, for example, but they must have different names, and vice versa: you can have multiple integrations of different types with the same name. Can't be a blank string!
Enabled
2.0.0
true
boolean
enabled
Whether the integration is enabled or not. If it's set to false, the integration won't be used, and no notifications will be sent through it, however you can still reference it in your monitors.
Global
2.0.0
false
boolean
global
Whether the integration is global or not. If it's set to true, the integration will be used for all monitors by default, even if they don't have a specific integration assigned to them. If it's set to false, the integration will only be used for monitors that explicitly reference it.
Excluded events
3.8.0
empty
list
excluded-events
Integrations are listening to every event by default, but you can configure them to exclude specific events if you don't want to receive notifications for them.
The valid options are the following:
HTTP_UPHTTP_DOWNPUSH_UPPUSH_DOWNSSL_VALIDSSL_INVALIDSSL_WILL_EXPIREICMP_UPICMP_DOWN
In case you don't specify any event types, or you provide an empty list, the integration will receive all the events.
integrations:
  pagerduty:
    - name: pd_global
      global: true
      excluded-events:
        - PUSH_DOWN
        - PUSH_UP
        - SSL_WILL_EXPIRE
      integration-key: YourOwnIntegrationKey
Slack
Configuration alias: slack
The Slack integration allows you to send notifications to a Slack channel via a webhook URL.
Webhook URL
2.0.0
string
webhook-url
The webhook URL of the Slack channel where the notifications will be sent. You can create a webhook URL in your Slack workspace by following the official documentation.
integrations:
  slack:
    - name: slack-example
      webhook-url: 'https://hooks.slack.com/services/T00000000/B00000000/XXXXXXXXXXXXXXXX'
    - name: slack-global
      webhook-url: 'https://hooks.slack.com/services/T00000000/B00000000/XXXXXXXXXXXXXXXX'
      global: true
    # ... other Slack integrations
Discord
Configuration alias: discord
The Discord integration allows you to send notifications to a Discord channel via a webhook URL.
Webhook URL
2.3.0
string
webhook-url
The webhook URL of the Discord channel where the notifications will be sent. You can create a webhook URL in your Discord server by following these steps:
- Go to your Discord server settings
- Navigate to Integrations → Webhooks
- Click New Webhook
- Configure the webhook name and select the target channel
- Copy the Webhook URL
For more information, see the official Discord documentation.
integrations:
  discord:
    - name: discord-example
      webhook-url: 'https://discord.com/api/webhooks/123456789/abcdef1234567890abcdef1234567890'
    - name: discord-global
      webhook-url: 'https://discord.com/api/webhooks/987654321/fedcba0987654321fedcba0987654321'
      global: true
    # ... other Discord integrations
Configuration alias: email
The email integration allows you to send notifications via email. You can have multiple email integrations, each with its own sender and recipient addresses.
Warning
To make the email integration work, it's not enough to just configure the integration itself, you also need to set up the SMTP configuration in your YAML file. You can have multiple email integrations, but they will all use the same SMTP configuration.
For more information, see the SMTP configuration section of the documentation.
From address
2.0.0
string
from-address
The email address from which the notifications will be sent. This is the address that will appear in the "From" field of the email.
To address
2.0.0
string
to-address
The email address to which the notifications will be sent.
integrations:
  email:
    - name: email_implicitly_enabled
      from-address: noreply@kuvasz-uptime.dev
      to-address: your@email.address
    - name: email_disabled
      from-address: noreply@other-sender.com
      to-address: other-recipient@blabla.com
      enabled: false
    # ... other email integrations
PagerDuty
Configuration alias: pagerduty
The PagerDuty integration allows you to trigger incidents in PagerDuty when a monitor goes down, and to automatically resolve them when the monitor comes back up.
Things to do in PagerDuty first
- From the Configuration menu, select Services.
- There are two ways to add an integration to a service:
- If you are adding your integration to an existing service: Click the name of the service you want to add the integration to. Then, select the Integrations tab and click the New Integration button.
- If you are creating a new service for your integration: Please read our documentation in section Configuring Services and Integrations and follow the steps outlined in the Create a New Service section, selecting "Kuvasz" as the Integration Type in step 4. Continue with the "In Kuvasz" section (below) once you have finished these steps.
- Enter an Integration Name in the format
monitoring-tool-service-name(e.g. Kuvasz-Your-Service) and select "Kuvasz" from the Integration Type menu. - Click the Add Integration button to save your new integration. You will be redirected to the Integrations tab for your service.
- An Integration Key will be generated on this screen. Keep this key saved in a safe place, as it will be used when you configure the integration with Kuvasz in the next section.
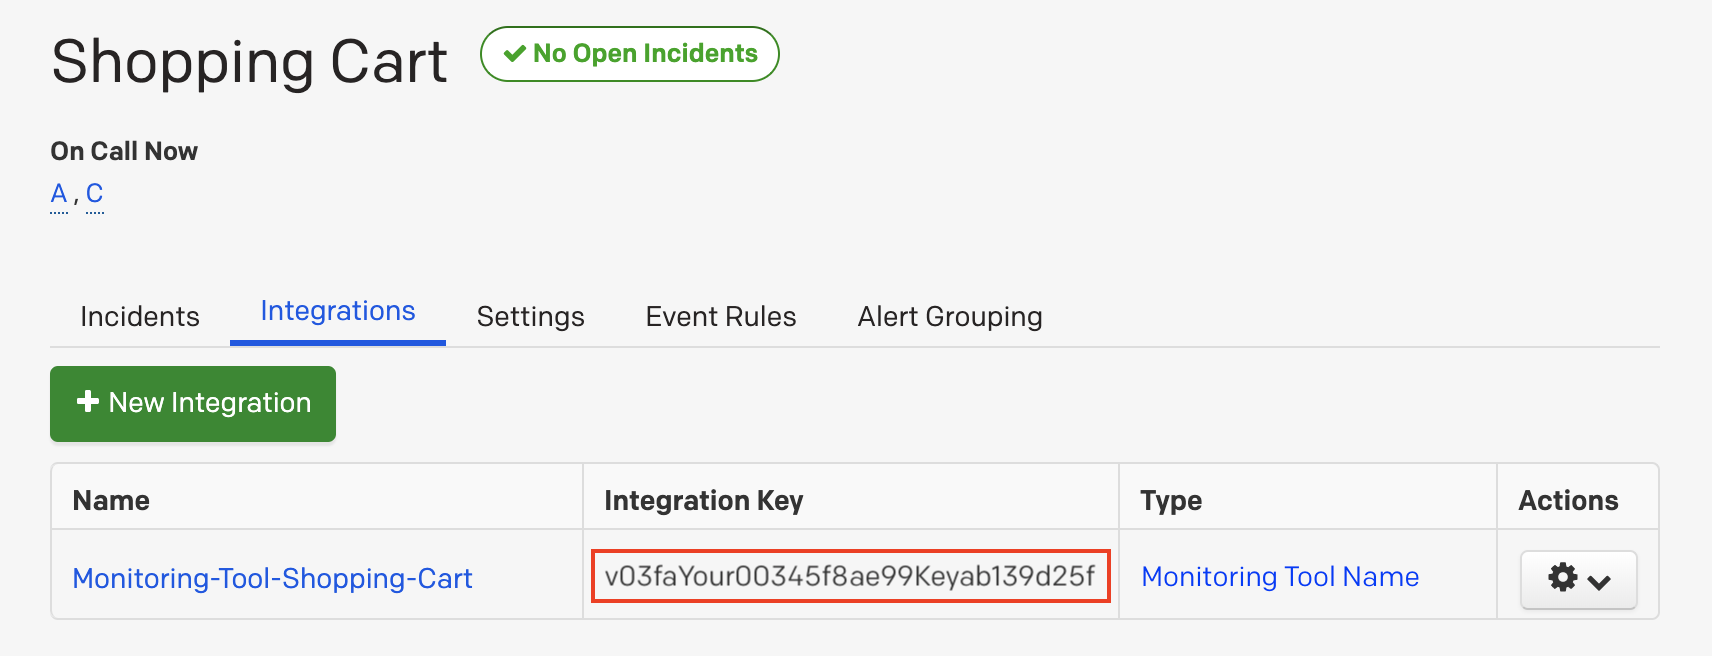
Integration Key
2.0.0
string
integration-key
The integration key of the PagerDuty service where the incidents will be created. You can find this key in your PagerDuty service settings.
integrations:
  pagerduty:
    - name: pd_global
      integration-key: YourOwnIntegrationKey
      global: true
    - name: pd_disabled
      integration-key: YourOtherIntegrationKey
      enabled: false
    # ... other PagerDuty integrations
Telegram
Configuration alias: telegram
The Telegram integration allows you to send notifications to a Telegram chat via a bot.
Getting your bot token and chat ID
- Create a new bot by talking to the BotFather on Telegram.
- After creating the bot, you will receive a bot token, this will be your
api-token. - Invite your bot to the chat where you want to receive notifications, or create a new group and add the bot to it.
-
To get your chat ID, send a message to your desired chat and then visit
https://api.telegram.org/bot<YourApiToken>/getUpdatesin your browser, where<YourApiToken>is the token you received from the BotFather. Look for something like this in the response, this will be yourchat-id:
API token
2.0.0
string
api-token
The API token of the Telegram bot that will send the notifications. You can get this token from the BotFather when you create your bot.
Chat ID
2.0.0
string
chat-id
The chat ID of the Telegram chat where the notifications will be sent. You can get this ID by following the steps outlined in the Getting your bot token and chat ID section.
integrations:
  telegram:
    - name: telegram_global
      api-token: 'YourToken'
      chat-id: '-1232642423121'
      global: true
    - name: telegram_disabled
      api-token: 'YourOtherToken'
      chat-id: '-1232546142423121'
      enabled: false
    # ... other Telegram integrations
Webhooks
Configuration alias: webhook
The Webhook integration allows you to send notifications to any endpoint that can receive HTTP requests. You can use it to integrate with 3rd party services that are not natively supported by Kuvasz, or to implement custom notification logic within your own infrastructure.
Warning
Make sure that your target endpoint handles the configured HTTP method and is able to process the payload sent by Kuvasz. Otherwise, you might end up with failed notifications and missed alerts.
The generic webhook message (if you don't use a custom template) has the following structure:
{
  "monitorId": "234 (6)",
  "monitorUrn": "http:GitHub API (1)",
  "monitorName": "GitHub API (2)",
  "monitorDetailsUrl": "/http-monitors/1 (7)",
  "timestamp": "1777661064488 (3)",
  "type": "HTTP_DOWN (4)",
  "eventDetails": "Your monitor \"GitHub API\" (https://api.github.com) is DOWN. Reason: Connect Error: Connection refused: api.github.com (5)"
}
- monitorUrn: A unique identifier of a monitor, formatted as 'type:name'.
- monitorName: The name of the monitor, which must be unique.
- timestamp: The timestamp of the event that triggered the webhook, in milliseconds since the Unix epoch.
- type: The type of the event that triggered the webhook, which can be one of the following values:
HTTP_UP,HTTP_DOWN,PUSH_UP,PUSH_DOWN,ICMP_UP,ICMP_DOWN,SSL_VALID,SSL_INVALID,SSL_WILL_EXPIRE. - eventDetails: A human-readable message with more details about the event.
- monitorId: A unique, numeric ID of a monitor.
- monitorDetailsUrl: The relative URL to the monitor details page in the Kuvasz web interface.
GenericWebhookMessage:
  required:
  - monitorId
  - monitorUrn
  - monitorName
  - monitorDetailsUrl
  - timestamp
  - type
  - eventDetails
  type: object
  properties:
    monitorId:
      type: integer
      format: int64
    monitorUrn:
      type: string
    monitorName:
      type: string
    monitorDetailsUrl:
      type: string
    timestamp:
      type: integer
      format: int64
    type:
      type: string
      enum:
        - HTTP_UP
        - HTTP_DOWN
        - PUSH_UP
        - PUSH_DOWN
        - ICMP_UP
        - ICMP_DOWN
        - SSL_VALID
        - SSL_INVALID
        - SSL_WILL_EXPIRE
    eventDetails:
      type: string
Header & payload templates
Kuvasz uses the Pebble templating engine, so you can use all the features provided by Pebble in your templates, including conditionals, loops, filters, and more. Pebble is very similar to Twig (PHP) and Jinja (Python) in order to make it easy to use and understand, even if you didn't work with a JVM templating engine before.
For further information on how to use Pebble templates, please refer to the official documentation.
Strict variables
Keep in mind that template variables are handled in a strict way, which means that if you try to use a variable that is not available in the context, or if you make a typo in the variable name, the template rendering will fail and the request won't be sent. So make sure to double-check your templates and test them before using them in production.
Available context variables
The context variables are available in an object named ctx, and the structure is the same as the generic webhook message described above, so for example you can use {{ctx.monitorName}} to include the name of the monitor in your payload, or {{ctx.type}} to include the type of the event that triggered the webhook.
Having conflicting characters in your hard-coded headers?
In case your template would contain some characters that interfere with Pebble's own syntax, you can use the {% verbatim %} tag to bypass parsing them, like this:
URL
3.8.0
string
url
The URL of the endpoint where the notifications will be sent. This can be any URL that can receive HTTP requests, for example, an API endpoint of a 3rd party service, or an endpoint of your own backend.
Starting from version 3.11.0, you can also use templates in the URL, which allows you to construct dynamic endpoint URLs based on the context of the event that triggered the webhook. For example, you can route notifications to different paths based on the event type:
Request headers
3.8.0
map
request-headers
Optional HTTP headers that will be included in the requests sent to the target URL. This can be useful, for example, to include an Authorization header if the target endpoint requires authentication.
The only header that is always included in the requests is the Content-Type header, which is set to application/json by default, but you can override it with your own value if needed.
Starting from version 3.9.0, you can also use templates in the header values, which allows you to include dynamic information in the headers based on the context of the event that triggered the webhook. For example, you can include the monitor name or the event type in a custom header by using a template like this:
HTTP method
3.11.0
POST
string
http-method
The HTTP method used when sending requests to the target URL. The valid options are POST, PUT, PATCH, and GET. Defaults to POST if not specified, which is the correct choice for most services. Use PUT or PATCH when your target endpoint explicitly requires it. Use GET for endpoints that only accept GET requests — note that in this case the payload will not be sent as a request body.
integrations:
  webhook:
    - name: matrix
      url: 'http://your-matrix-webhook-host:4785/!roomid:your-homeserver/your-shared-token'
      http-method: PUT
Payload template
3.8.0
string
payload-template
You can customize the payload of the requests sent to the target URL by providing a payload template. This template can include any of the available context variables, which will be replaced with their actual values when the request is sent. This allows you to create custom payloads that fit the requirements of your target endpoint.
webhook:
  - name: webhook_templated
    url: https://any-other-http.service/webhooks
    http-method: POST
    excluded-events:
      - PUSH_UP
      - HTTP_UP
      - SSL_WILL_EXPIRE
    request-headers:
      Accept: '*/*'
      Authorization: Bearer your-webhook-secret-token
      X-Custom-Header: custom-value
    payload-template: |
      {
        "monitorName": "{{ctx.monitorName}}",
        "type": "{{ctx.type}}"
      }
  - name: webhook_put
    url: https://any-other-http.service/resource/123
    http-method: PUT
    payload-template: |
      {
        "monitorName": "{{ctx.monitorName}}",
        "type": "{{ctx.type}}"
      }
  # ... other Webhook integrations
Webhook examples
Here are some examples of webhook configurations that you can use for different 3rd party services as a starting point. Kuvasz is using Pebble as a templating engine under the hood, for further information on how to use Pebble templates, please refer to the official documentation.
Sharing is caring!
Did you make a cool webhook configuration that you would like to share with the community? Feel free to open a PR on GitHub with your example, and we will add it to the documentation!
Signal (via signal-cli-rest-api)
This example sends notifications to a Signal chat using signal-cli-rest-api — a self-hosted, dockerized REST wrapper around signal-cli. You need a dedicated Signal number registered with the container (see the project's README for setup).
integrations:
  webhook:
    - name: signal
      url: 'http://your-signal-api-host:8080/v2/send'
      payload-template: |
        {
          "message":    "{{ ctx.eventDetails | escape(strategy="js") }}",
          "number":     "+15550001234",
          "recipients": ["+15550005678"]
        }
Twilio — SMS
This example sends an SMS via the Twilio Messaging API.
Content type
Twilio's Messaging API requires application/x-www-form-urlencoded payloads, not JSON. The example below overrides the default Content-Type header accordingly, and uses escape(strategy="url_param") to URL-encode the dynamic message body.
Twilio setup:
- Log in to the Twilio Console.
- On the dashboard, note your Account SID and Auth Token.
- Make sure you have a Twilio phone number capable of sending SMS. You can get one under Phone Numbers → Manage → Buy a number.
-
Compute your Base64-encoded credentials by running the following command, then copy the output:
integrations:
  webhook:
    - name: twilio-sms
      url: 'https://api.twilio.com/2010-04-01/Accounts/ACxxxxxxxxxxxxxxxxxxxxxxxxxxxxxxxx/Messages.json'
      request-headers:
        Content-Type: "application/x-www-form-urlencoded"
        Authorization: "Basic <your-base64-encoded-credentials>"
      payload-template: |
        From=%2B15551234567&To=%2B15550005678&Body={{ ctx.eventDetails | escape(strategy="url_param") }}
Replace %2B15551234567 with your Twilio number and %2B15550005678 with the recipient number — both with the leading + pre-encoded as %2B.
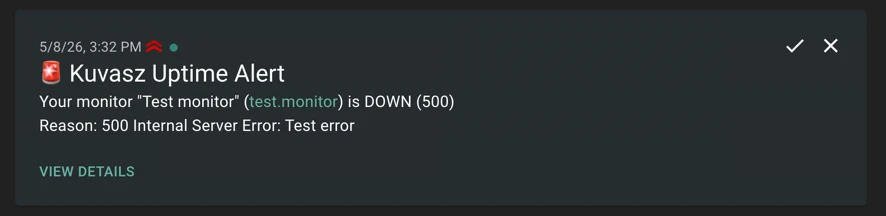
ntfy
This example sends notifications to an ntfy topic — a lightweight, self-hostable push notification service. ntfy supports both the hosted ntfy.sh server and self-hosted instances.
integrations:
  webhook:
    - name: ntfy_test
      url: https://ntfy.sh
      payload-template: |
        {
          "topic": "kuvasz_uptime_test",
          "message": "{{ ctx.eventDetails | escape(strategy="js") }}",
          "title": "Kuvasz Uptime Alert",
          "tags": [ "rotating_light" ],
          "priority": 4,
          "attach": null,
          "filename": null,
          "click": null,
          "actions": [ { "action": "view", "label": "View details", "url": "https://demo.kuvasz-uptime.dev{{ctx.monitorDetailsUrl}}" } ]
        }
Pushover
This example sends a push notification via Pushover — a simple, cross-platform push notification service supporting Android, iOS, and desktop.
Pushover setup:
- Sign up at pushover.net and copy your User Key from the dashboard.
- Create a new application under Your Applications and copy the resulting API Token.
integrations:
  webhook:
    - name: pushover
      url: 'https://api.pushover.net/1/messages.json'
      payload-template: |
        {
          "token":    "your_app_api_token",
          "user":     "your_user_or_group_key",
          "title":    "{{ ctx.monitorName | escape(strategy="js") }}",
          "message":  "{{ ctx.eventDetails | escape(strategy="js") }}",
          "priority": {% if ctx.type == 'HTTP_DOWN' or ctx.type == 'ICMP_DOWN' or ctx.type == 'PUSH_DOWN' or ctx.type == 'SSL_INVALID' %}1{% else %}0{% endif %}
        }
The priority field is set to 1 (high — bypasses quiet hours) for "down" and "invalid" events, and 0 (normal) for everything else. You can raise it to 2 (emergency — requires acknowledgement) for truly critical alerts, but that requires additional retry and expire fields in the payload — see the Pushover API documentation for details.
Home Assistant — webhook automation
This example triggers a Home Assistant webhook automation when a monitor event occurs, letting you react to uptime events natively within Home Assistant — for example, to send a mobile notification, toggle a switch, or run a script.
Tip
If you want to read monitor data from Kuvasz instead of receiving push events, see the official Home Assistant integration.
Home Assistant setup:
- Go to Settings → Automations & Scenes → Automations and click + Create automation.
- Select "Create new automation" and add a Webhook trigger. Copy the generated, secure webhook ID and make sure POST is listed under Allowed HTTP methods. The resulting webhook URL is something like:
http://your-ha-instance:8123/api/webhook/yourVerySecretWebhookId - Add any actions you like, and save the automation.
The fields from the Kuvasz payload are available in Home Assistant automation templates via trigger.json, for example:
| Kuvasz field | Home Assistant template |
|---|---|
type |
{{ trigger.json.type }} |
monitorName |
{{ trigger.json.monitorName }} |
message |
{{ trigger.json.message }} |
integrations:
  webhook:
    - name: home-assistant
      url: 'http://your-ha-instance:8123/api/webhook/yourVerySecretWebhookId'
      payload-template: |
        {
          "type":        "{{ ctx.type }}",
          "monitorName": "{{ ctx.monitorName | escape(strategy="js") }}",
          "message":     "{{ ctx.eventDetails | escape(strategy="js") }}"
        }
Webhook ID is the secret
Home Assistant webhook triggers don't require an Authorization header — the webhook ID itself acts as the shared secret. Keep it reasonably hard to guess and, where possible, restrict external access to the endpoint via your firewall or reverse proxy.
Google Chat
This example posts a message to a Google Chat space via an incoming webhook.
Google Chat setup:
- Open the target space in Google Chat and click the space name at the top.
- Go to Integrations → Webhooks → Add webhook.
- Give the webhook a name (e.g. Kuvasz) and click Save. Copy the generated Webhook URL.
integrations:
  webhook:
    - name: google-chat
      url: 'https://chat.googleapis.com/v1/spaces/SPACE_ID/messages?key=KEY&token=TOKEN'
      payload-template: |
        {
          "text": "{{ ctx.eventDetails | escape(strategy="js") }}"
        }
Apprise API
Apprise API is a self-hosted REST wrapper around 80+ notification services (Slack, Discord, Telegram, email, and many more). One Kuvasz webhook config can fan out to multiple targets at once.
Apprise API setup:
Deploy the Apprise API server (Docker image: caronc/apprise). You can then use it in two ways:
- Stateless: pass one or more notification URLs directly in the payload.
- Stateful: persist a set of URLs under a named key in Apprise, then reference that key in the webhook URL — no secrets in the Kuvasz config.
integrations:
  webhook:
    - name: apprise-stateless
      url: 'http://your-apprise-host/notify/'
      payload-template: |
        {
          "urls":  "slack://TokenA/TokenB/TokenC",
          "title": "{{ ctx.monitorName | escape(strategy="js") }}",
          "body":  "{{ ctx.eventDetails | escape(strategy="js") }}"
        }
# Pre-configure your notification URLs in Apprise under a key (e.g. `kuvasz`) via `POST /add/kuvasz`, then:
integrations:
  webhook:
    - name: apprise-stateful
      url: 'http://your-apprise-host/notify/kuvasz'
      payload-template: |
        {
          "title": "{{ ctx.monitorName | escape(strategy="js") }}",
          "body":  "{{ ctx.eventDetails | escape(strategy="js") }}"
        }
For the full list of supported service URL formats, see the Apprise wiki.
Mattermost
This example posts a message to a Mattermost channel via an incoming webhook. Mattermost's webhook format is compatible with Slack's, so the payload is identical.
Mattermost setup:
- In Mattermost, go to Main menu → Integrations → Incoming webhooks → Add incoming webhook.
- Select the target channel, give the webhook a display name, and click Save.
- Copy the generated webhook URL.
Incoming webhooks may be disabled
If you don't see the Integrations menu, ask your Mattermost system administrator to enable incoming webhooks.
integrations:
  webhook:
    - name: mattermost
      url: 'https://your-mattermost-instance/hooks/your_webhook_token'
      payload-template: |
        {
          "text": "{{ ctx.eventDetails | escape(strategy="js") }}"
        }
You can also target a different channel than the one set during webhook creation, set a custom username, or override the icon — all via standard Mattermost payload fields:
integrations:
  webhook:
    - name: mattermost-custom
      url: 'https://your-mattermost-instance/hooks/your_webhook_token'
      payload-template: |
        {
          "channel":   "town-square",
          "username":  "Kuvasz",
          "icon_url":  "https://kuvasz-uptime.dev/images/kuvasz-logo.webp",
          "text":      "{{ ctx.eventDetails | escape(strategy="js") }}"
        }
Rocket.Chat
This example posts a message to a Rocket.Chat channel via an incoming webhook. Like Mattermost, Rocket.Chat uses a Slack-compatible webhook format.
Rocket.Chat setup:
- Go to Administration → Integrations → New and select Incoming webhook.
- Set Enabled to
true, choose the target channel, and give the integration a name. - Click Save and copy the generated webhook URL.
integrations:
  webhook:
    - name: rocketchat
      url: 'https://your-rocketchat-instance/hooks/your_token/your_secret'
      payload-template: |
        {
          "text": "{{ ctx.eventDetails | escape(strategy="js") }}"
        }
Rocket.Chat supports the same optional fields as Mattermost (channel, username, icon_url, icon_emoji) so you can use the same overrides shown in the Mattermost example above.
Testing integrations
It's vital to ensure that your integrations are correctly set up to receive notifications. You can test your integrations (even the disabled ones) directly either:
- From the web interface by navigating to the Integrations page and clicking the button next to the integration you want to test. In this case you'll see the result in a visual way, at the same place where you initiated the test.
- Via the API by sending a
POSTrequest to/api/v2/integrations/{integrationId}/test, where{integrationId}is the ID of the integration you want to test (for example,slack:your-desired-name). In this case the payload of the response should be straightforward to understand whether the test was successful or not.
Testing PagerDuty integrations
Please note that when testing PagerDuty integrations, a real incident will be created in your account, which will be immediately resolved by Kuvasz.
Testing webhook integrations
When you test a Webhook integration, a separate test message will be generated and sent for every event type that the integration watches, so for example if you have an integration that watches both HTTP_UP and HTTP_DOWN events, you will receive two separate messages in your target endpoint when you test the integration: one for the UP event and one for the DOWN event. The "down" events will be always fired first to simulate a real downtime scenario, and the "up" events will be fired immediately after to simulate the recovery of the monitor.

Do you miss an integration?
If you miss an integration, please open an issue, or consider contributing it yourself! We are always open to new integrations and would love to see your contribution.